Lets first understand billing process at high level: (how we convert time to money)
Step 1: Creating Time-Entries:
Users (support agents) track labor as time-entries against Case. The selected “Charge Type” helps in calculation of extended price. (In future the time-entries could also be linked to a Contract – which would provide you with multiple billing options)
Step 2: Approval process:
Here users (having Zap PSA User / Admin roles) approve time-entries. (time-entry status becomes “approved”).
Step 3: Posting process:
Here users (having Zap PSA User / Admin roles) post time-entries. (time-entry.posted is set to “YES”). This step is like a financial review step where the user (with necessary permissions) needs to make sure that the charges (pending revenue) are correct.
Please note that steps 2 and 3 are optional. You can configure whether time-entries need to go through approval & posting process or not (have these fields automatically set on creation).
Step 4: Invoicing:
You can now export the time-entries to your accounting system to generate the invoice. (We will be providing invoicing module in future). These charges now becomes revenue!
Step 5: Reports:
You can generate reports to track revenue, profits and profitability!
Labor / Time entry Billability Calculation (for T&M):
Here we refer “Labor” to the work performed by your resources …they would log this time and then we could charge the customer for that time.
Billing for time-entries is mainly controlled via contracts. However if no contracts are in-place then too you could do billing. This is done using “Charge Types”!
You could use contracts to:
- Use a different Hourly Rate (Contract Rate, Contract Staff Rates)
- Use a different Customer Service Calendar (vs globally defined one) – we use CS Calendar to determine whether the time entered is OOH or on Holiday.
- Manage by Block, Retainers, Number of Cases purchased
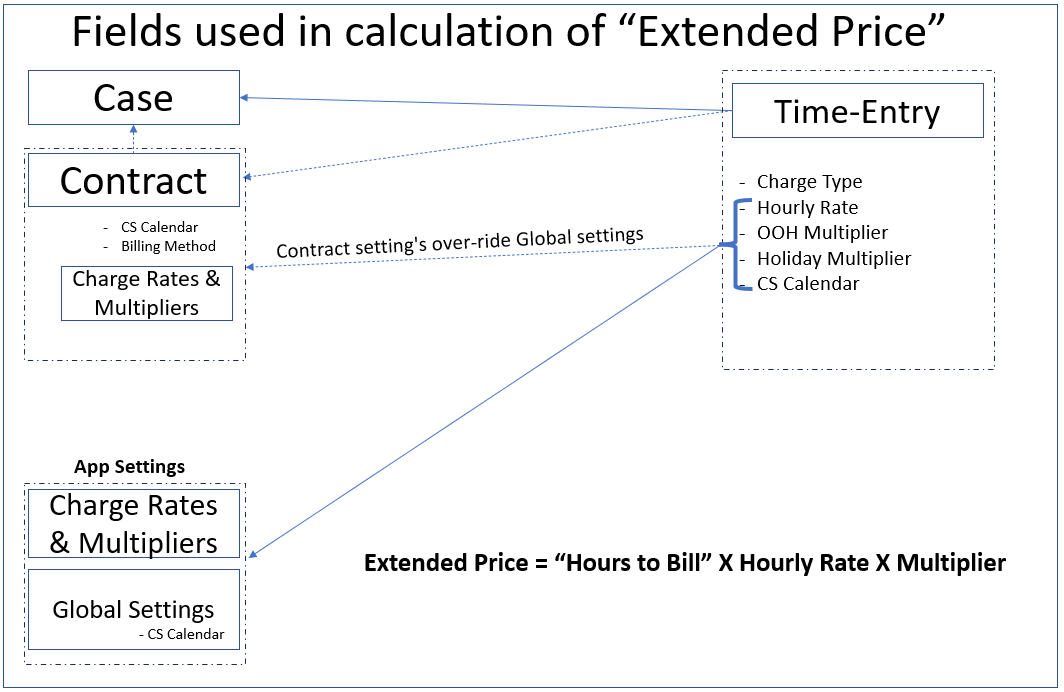
Zap PSA calculates T&M billing as follows:
Extended Price = Hours To Bill X Hourly Rate X Multiplier
Here “Hourly Rate” & “Multiplier” is determined by “Charge Type” (which is selected in time-entry).
Charge Type: is the type of work being performed. e.g. remote support, onsite support, maintenance etc.
You can configure charge types and charge rates under settings.
Below shows an example of how extended price will be calculated:
The table shows sample charge types, rates and multipliers:
|
Charge Type |
Charge Rate |
OOH Multiplier |
Holiday Multiplier |
|
Onsite Support |
$250 |
1.5 |
2.0 |
|
Remote Support |
$120 |
1.5 |
2.0 |
|
Ad-hoc Support |
$150 |
1.5 |
2.0 |
|
Maintenance |
$100 |
1.5 |
2.0 |
Actual Time: 45 mins
Hours to Bill: 1 hr
Start Date-Time is OOH
Charge Type = Onsite Support
Labor = 1 X $250 X 1.5 = $375
Points to note regarding “Extended Price” calculation:
1. “Extended Price” for time-entry can be calculated with or without referring a contract. When you use a contract, you will have the ability to use more billing combinations.
2. In App settings, you can set Charge Rates and Multipliers, Customer Service Calendar (in Global Settings), etc.
You could further over-ride these values in a Contract.
3. We use the Customer Service Calendar to check if the “Time-Entry. Start Time” is within the regular office time or OOH or Holiday. This determines which “Multiplier” will be used in “Extended Price” calculation. Please note that we do not check the “Actual Time” but only “Time-Entry.Start Date-Time” against the customer service calendar. For example if your working hours is until 5 pm and you log 1 hr as “actual time” starting at 4:30 pm… then the system will consider this to be regular time (and not 30 minutes of OOH time). In scenarios like this you need to log 2 time entries – one from 4:30pm to 5 pm (will be considered as Regular time) and then another one from 5pm to 5:30 pm (will be considered as OOH).
4. The Hourly Rate is the “Charge Rate” based on selected “Charge Type”. If you use contracts then you could use different billing method like Contract Rate, Contract Staff Rate etc.